A Site to Site VPN can be setup between your home and business, two office locations, or between family members. Some common use cases would be to share files, printers, provide technical support (RDP/VNC), view webcams (without opening webcam to the internet) and my favorite, as a mean for secure offsite backups.
By going through this tutorial you'll also learn:
- How to setup a Certificate Authority on your router and generate Certificates and Keys
- Setup (free) Dynamic DNS
- Setup cross site name resolution (static DNS host entries)
- A little bit on expanding the setup to include Client to Site VPN
- How to enable SFTP on your router for secure access to certificates and keys
Last updated and verified on 3/3/2014
Here's a video walk-through of the whole process (24 minutes!). Note that this video is a little dated and should only be used as a reference. This blog has the correct instructions:
What you'll need:
- Two routers with Tomato already installed.*
- The OpenVPN Server router should be running TomatoUSB (with a USB port)
- The OpenVPN Client router can run regular Tomato (no USB port required)
- USB Flash Drive >=1GB (will be completely wiped)
- Publicly accessible IP address for OpenVPN Server router.
Outline of Steps
1) Setup OpenVPN Server on Site A Router
b) Generate RSA Certificates and Keys
c) Configure OpenVPN Server
d) Setup Free Dynamic DNS Service
e) Start OpenVPN Server
a) Configure OpenVPN Client
4) That's it! Enjoy.
Network Info
Site A
OpenVPN Server
Internal network/subnetmask - 192.168.1.0/255.255.255.0
External Public IP Address
Site B
OpenVPN Client
Internal network/subnetmask - 192.168.2.0/255.255.255.0
External Public IP Address
-------------------------------------------------------------------------------
LETS GET STARTED!
Setup OpenVPN Server on Site A Router
Plug in USB flash drive. Make sure the router has internet access.
Connect via SSH into router. For Windows, I recommend Putty.
Log in with username of root and password of admin.
Execute the following commands:
#Partition your usb flash drive
umount /dev/sda1
fdisk /dev/sda
#format newly created partition
#label disk as 'optware' case sensitive
umount /dev/sda1
mke2fs -j -L optware /dev/sda1
Install Entware (a package manager that allows you to install additional software on your router)
Setup Certificate Authority (CA)
#Setup and initialize environment
cd /opt/etc/easy-rsa

ca /opt/etc/easy-rsa/keys/ca.crt


On your router, go to Basic -> DDNS (http://192.168.1.1/basic-ddns.asp)
For Dynamic DNS 1, select "FreeDNS(afraid.org)" in the "Service" dropdown.
Paste in the URL you copied in the previous step (note that the URL will change to a token)
Check "Force next update"
Change the "Auto refresh every" to 7 or something lower than 30.
[Save]
Last Result should say Update Successfully.

Start OpenVPN Server
Go to VPN Tunneling -> OpenVPN Server (http://192.168.1.1/vpn-server.asp).
On "Server 1 -> Status" Tab, click the "Start Now" button. Give it a few seconds and click on the "Refresh Status" link.
If you see the following, then the OpenVPN Server has started successfully. Congratulations we're almost there. Note that the button will change to "Stop Now". If the button remains as "Start Now", we have a problem. Go back and review the instructions.


Cross Site Name Resolution
At this point your Site to Site VPN is setup, but you'll only able to access network resources via IP Addresses.
To access network resources via a friendly name, you'll need to do two things:
1) Setup static DHCP lease reservation for the network device (you don't want the IP address changing)
- Go to Basic->Static DHCP/ARP/IPT
2) On the opposite router, setup a static WINS/DNS entry for the same network device
Go to Basic->Static DHCP/ARP/IPT. Typically the Static DHCP/ARP/IPT screen is for configuring static DHCP lease reservation, however you can use for static WINS/DNS entries also. The secret is to leave the MAC Address blank or with all zeros, "00:00:00:00:00".
In the screenshot below, on SiteB, I've setup a static hostname of "SiteARouter" so that I can access it via the friendly name versus the IP Address (192.168.1.1). From SiteB, I'm now able to access SiteARouter via name. Configure static hostname entries for all network resources you want to access on both your VPN sites.

That's it!! Enjoy.
Client to Site VPN
You should easily be able to add additional OpenVPN Clients (for Client to Site VPN) by generating additional RSA Certs/Key on your OpenVPN Server Router.
4) That's it! Enjoy.
Network Info
Site A
OpenVPN Server
Internal network/subnetmask - 192.168.1.0/255.255.255.0
External Public IP Address
Site B
OpenVPN Client
Internal network/subnetmask - 192.168.2.0/255.255.255.0
External Public IP Address
LETS GET STARTED!
Setup OpenVPN Server on Site A Router
Plug in USB flash drive. Make sure the router has internet access.
Connect via SSH into router. For Windows, I recommend Putty.
Log in with username of root and password of admin.
Execute the following commands:
#Partition your usb flash drive
umount /dev/sda1
fdisk /dev/sda
Type in the following commands to create a primary partition on your USB Flash drive
# p # list current partitions
# o # to delete all partitions
# n # new partition
# p # primary partition
# 1 (one) # first partition
# <enter> # default start block
# <enter> # default end block #use the whole flash drive
# w # write new partition to disk
# p # list current partitions
# o # to delete all partitions
# n # new partition
# p # primary partition
# 1 (one) # first partition
# <enter> # default start block
# <enter> # default end block #use the whole flash drive
# w # write new partition to disk
#format newly created partition
#label disk as 'optware' case sensitive
umount /dev/sda1
mke2fs -j -L optware /dev/sda1
Install Entware (a package manager that allows you to install additional software on your router)
#mount the new disk partition
mount /dev/sda1 /opt
cd /opt
wget http://wl500g-repo.googlecode.com/svn/ipkg/entware_install.sh
sh ./entware_install.sh
Install openvpn-easy-rsa
opkg install openvpn-easy-rsa nano
Setup working folder for openvpn-easy-rsa
It's recommended that you cut/paste everything up to Setup CA section into your console window to prevent any error/typos
#copy files to working directory
cd /opt/etc/easy-rsa
cp /opt/sbin/sign-req .
cp /opt/sbin/build-req .
cp /opt/sbin/inherit-inter .
cp /opt/sbin/revoke-full .
cp /opt/sbin/clean-all .
cp /opt/sbin/build-ca .
cp /opt/sbin/pkitool .
cp /opt/sbin/build-dh .
cp /opt/sbin/build-key-pass .
cp /opt/sbin/build-key-pkcs12 .
cp /opt/sbin/list-crl .
cp /opt/sbin/whichopensslcnf .
cp /opt/sbin/build-key-server .
cp /opt/sbin/build-key .
cp /opt/etc/easy-rsa/openssl-1.0.0.cnf .
cp /opt/sbin/build-inter .
cp /opt/sbin/build-req-pass .
#reduce key_size to 1024 in vars file
cd /opt/etc/easy-rsa
sed -i 's:KEY_SIZE=2048:KEY_SIZE=1024:' ./vars
#update PATH to pick up correct openssl (save a reboot)
#correct = /opt/bin/openssl
PATH=/opt/bin:$PATH
mount /dev/sda1 /opt
cd /opt
wget http://wl500g-repo.googlecode.com/svn/ipkg/entware_install.sh
sh ./entware_install.sh
#Make sure /opt is properly mounted on a reboot.
echo "LABEL=optware /opt ext3 defaults 1 1" >> /etc/fstab
nvram setfile2nvram /etc/fstab
nvram commit
Install openvpn-easy-rsa
opkg install openvpn-easy-rsa nano
Setup working folder for openvpn-easy-rsa
It's recommended that you cut/paste everything up to Setup CA section into your console window to prevent any error/typos
#copy files to working directory
cd /opt/etc/easy-rsa
cp /opt/sbin/sign-req .
cp /opt/sbin/build-req .
cp /opt/sbin/inherit-inter .
cp /opt/sbin/revoke-full .
cp /opt/sbin/clean-all .
cp /opt/sbin/build-ca .
cp /opt/sbin/pkitool .
cp /opt/sbin/build-dh .
cp /opt/sbin/build-key-pass .
cp /opt/sbin/build-key-pkcs12 .
cp /opt/sbin/list-crl .
cp /opt/sbin/whichopensslcnf .
cp /opt/sbin/build-key-server .
cp /opt/sbin/build-key .
cp /opt/etc/easy-rsa/openssl-1.0.0.cnf .
cp /opt/sbin/build-inter .
cp /opt/sbin/build-req-pass .
#reduce key_size to 1024 in vars file
cd /opt/etc/easy-rsa
sed -i 's:KEY_SIZE=2048:KEY_SIZE=1024:' ./vars
#update PATH to pick up correct openssl (save a reboot)
#correct = /opt/bin/openssl
PATH=/opt/bin:$PATH
Setup Certificate Authority (CA)
#Setup and initialize environment
cd /opt/etc/easy-rsa
source ./vars
./clean-all
#Select Default for All, Keep Hitting <Enter> (8 times)
./build-ca
Generate Diffie Hellman parameters (DH file)
./build-dh
Generate Certificate and Key for the OpenVPN Server router at Site A with Common Name [CN] of "OpenVPNServer".
#Generate Cert/Key for Site2SiteClient
#<Enter> 10 times to take default value
#Followed by two 'y' <Enter> when asked to sign and commit
./build-key-server OpenVPNServer
Generate Certificate and Key for the OpenVPN Client router Site B with Common Name [CN] of "Site2SiteClient". The "Common Name" isn't really "common". Make sure its unique for all your clients.
#Generate Cert/Key for Site2SiteClient
#<Enter> 10 times to take default value
#Followed by two 'y' <Enter> when asked to sign and commit
./build-key Site2SiteClient
Output Certificate and Key to console - cut/paste into text file for later use.
cat /opt/etc/easy-rsa/keys/ca.crt
cat /opt/etc/easy-rsa/keys/Site2SiteClient.crt
cat /opt/etc/easy-rsa/keys/Site2SiteClient.key
Create a new text file on your computer and name it "ClientRouterKeys.txt" and cut and paste in the output of the three cat commands above. You'll need this file to setup the OpenVPN Client Router later in the tutorial.
That's it for the SSH Console. The rest of the configuration will be done via a web browser.
Configure OpenVPN Server
Open your favorite browser and connect to your router and go to VPN Tunneling -> OpenVPN Server (http://192.168.1.1/vpn-server.asp).
On "Server 1 -> Basic" Tab, check "Start with WAN". Leave everything else as default.
OpenVPN Server Configuration Server 1->Basic Screen should look like the following:
On "Server 1 -> Basic" Tab, check "Start with WAN". Leave everything else as default.
OpenVPN Server Configuration Server 1->Basic Screen should look like the following:

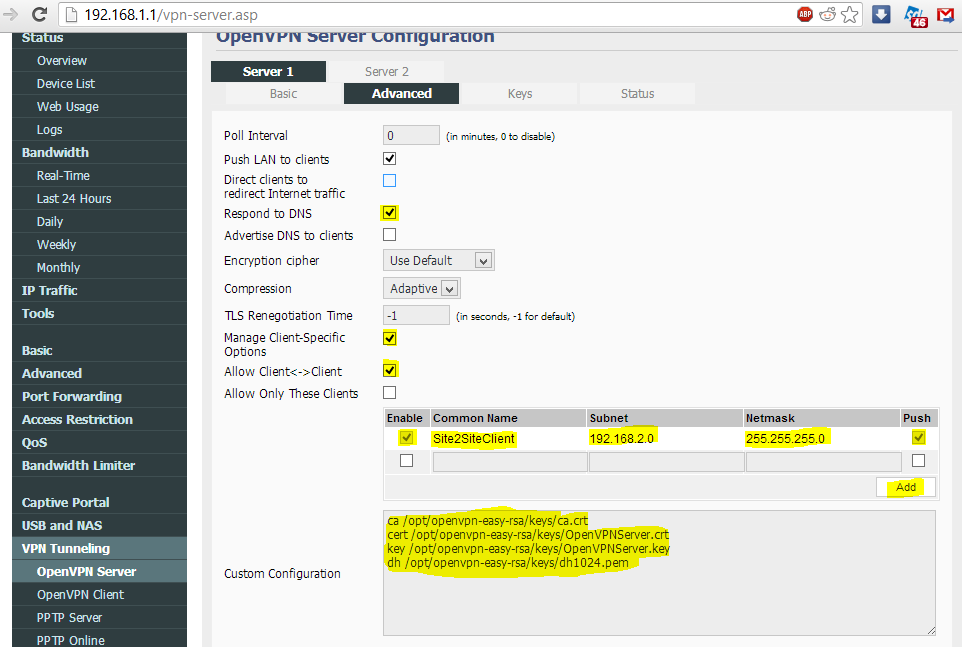
Change to the Advanced Tab
Check "Respond to DNS"
Check "Manage Client-Specific Options"
Check "Allow Client<->Client"
Check "Enable"
Type in "Site2SiteClient" under "Common Name"
Type in "192.168.2.0" under Subnet
Type in "255.255.255.0" under Netmask
Check Push
Click 'Add' button. (pushes routes to the client router and add route to server router. No need for router/iptable commands)
In the "Custom Configuration" box, paste in the following (saves us from pasting in the certs/key in the Keys Tab and valuable nvram space):
ca /opt/etc/easy-rsa/keys/ca.crt
cert /opt/etc/easy-rsa/keys/OpenVPNServer.crt
key /opt/etc/easy-rsa/keys/OpenVPNServer.key
key /opt/etc/easy-rsa/keys/OpenVPNServer.key
dh /opt/etc/easy-rsa/keys/dh1024.pem
[Save]
OpenVPN Server Configuration Server 1->Advanced Screen should look like the following:

Setup Free Dynamic DNS Service (http://freedns.afraid.org/)
If you don't have a public static IP (most don't), you'll need to setup DDNS so your OpenVPN client(s) can find your OpenVPN server.
If you don't have a public static IP (most don't), you'll need to setup DDNS so your OpenVPN client(s) can find your OpenVPN server.
Go to http://freedns.afraid.org and setup an account and then setup a subdomain.
I'm using "OpenVPNServer.mooo.com" (use something else). We'll need this subdomain during the OpenVPN Client setup.
I'm using "OpenVPNServer.mooo.com" (use something else). We'll need this subdomain during the OpenVPN Client setup.

On the left hand side, select "Dynamic DNS" or go to http://freedns.afraid.org/dynamic
Find the subdomain you just created and right click on the "Direct URL" link and select "Copy link address"

On your router, go to Basic -> DDNS (http://192.168.1.1/basic-ddns.asp)
For Dynamic DNS 1, select "FreeDNS(afraid.org)" in the "Service" dropdown.
Paste in the URL you copied in the previous step (note that the URL will change to a token)
Check "Force next update"
Change the "Auto refresh every" to 7 or something lower than 30.
[Save]
Last Result should say Update Successfully.

Start OpenVPN Server
Go to VPN Tunneling -> OpenVPN Server (http://192.168.1.1/vpn-server.asp).
On "Server 1 -> Status" Tab, click the "Start Now" button. Give it a few seconds and click on the "Refresh Status" link.
If you see the following, then the OpenVPN Server has started successfully. Congratulations we're almost there. Note that the button will change to "Stop Now". If the button remains as "Start Now", we have a problem. Go back and review the instructions.

Configuration of Site A Router is complete. Go ahead and reboot the router and verify that OpenVPN Server started properly.
Let's move on to setting up your Site B Router.
Setup OpenVPN Client on Site B Router
Configure OpenVPN Client
At Site B, open up your browser and go to VPN Tunneling -> OpenVPN Client (http://192.168.2.1/vpn-client.asp). Go to Client 1 -> Basic.
Type in the Dynamic DNS address (subdomain) you setup for your Site A router in the "Server Address" field. In my example, "OpenVPNServer.mooo.com"
Uncheck the "Connect NAT on tunnel"
Check "Start with WAN"
[Save]
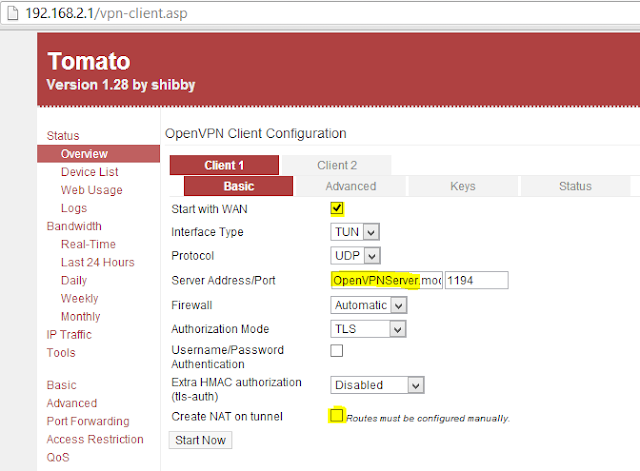
Nothing has to be changed on the Client 1 -> Advanced Tab
Open up the Client 1 -> Keys Tab.
Open up "ClientRouterKeys.txt" file you created earlier in the tutorial and cut/paste the certificates and key into the appropriate field.
ca.crt in the Certificate Authority box
Site2SiteClient.crt in the Client Certificate box
Site2SiteClient.key in the Client Key box
Don't forget to [Save].


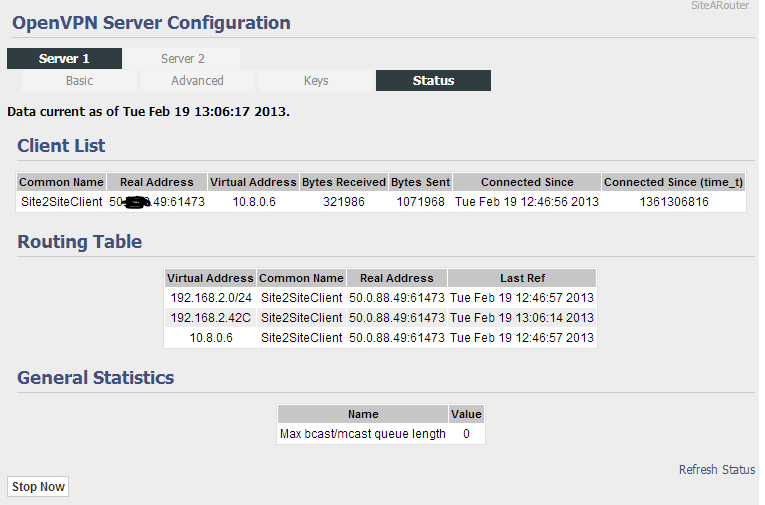
Your done with the configuration. The moment of truth, on the Client 1 -> Status Tab, Click "Start Now"
Wait a few seconds and click on the "Refresh Status" link. Hopefully you'll see some bytes in the Value column.

From Site B, you should now be able to access Site A network resources and vice-versa.
Lets give the VPN a quick test. Still connected to Site B, open up the OpenVPN Server Configuration page on your Site A router @ http://192.168.1.1/vpn-server.asp. Hopefully you can see a successfully status page like the one below:
Let's move on to setting up your Site B Router.
Setup OpenVPN Client on Site B Router
Configure OpenVPN Client
At Site B, open up your browser and go to VPN Tunneling -> OpenVPN Client (http://192.168.2.1/vpn-client.asp). Go to Client 1 -> Basic.
Type in the Dynamic DNS address (subdomain) you setup for your Site A router in the "Server Address" field. In my example, "OpenVPNServer.mooo.com"
Uncheck the "Connect NAT on tunnel"
Check "Start with WAN"
[Save]

Nothing has to be changed on the Client 1 -> Advanced Tab
Open up the Client 1 -> Keys Tab.
Open up "ClientRouterKeys.txt" file you created earlier in the tutorial and cut/paste the certificates and key into the appropriate field.
ca.crt in the Certificate Authority box
Site2SiteClient.crt in the Client Certificate box
Site2SiteClient.key in the Client Key box
Don't forget to [Save].


Your done with the configuration. The moment of truth, on the Client 1 -> Status Tab, Click "Start Now"
Wait a few seconds and click on the "Refresh Status" link. Hopefully you'll see some bytes in the Value column.

From Site B, you should now be able to access Site A network resources and vice-versa.
Lets give the VPN a quick test. Still connected to Site B, open up the OpenVPN Server Configuration page on your Site A router @ http://192.168.1.1/vpn-server.asp. Hopefully you can see a successfully status page like the one below:
Cross Site Name Resolution
At this point your Site to Site VPN is setup, but you'll only able to access network resources via IP Addresses.
To access network resources via a friendly name, you'll need to do two things:
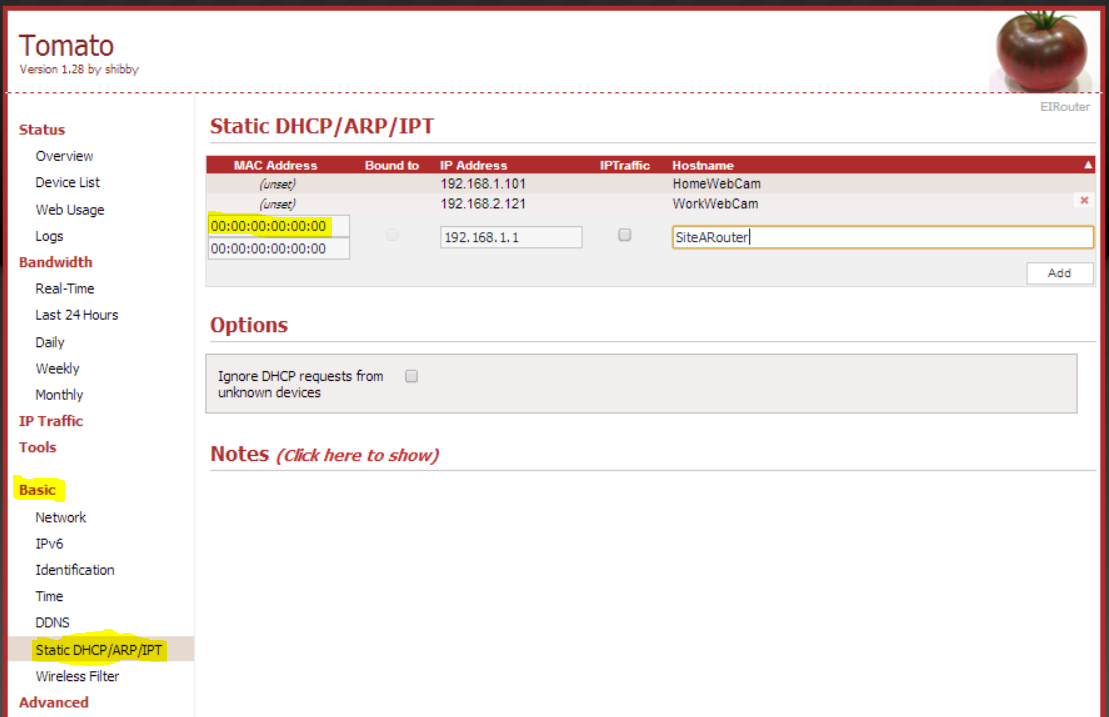
1) Setup static DHCP lease reservation for the network device (you don't want the IP address changing)
- Go to Basic->Static DHCP/ARP/IPT
2) On the opposite router, setup a static WINS/DNS entry for the same network device
Go to Basic->Static DHCP/ARP/IPT. Typically the Static DHCP/ARP/IPT screen is for configuring static DHCP lease reservation, however you can use for static WINS/DNS entries also. The secret is to leave the MAC Address blank or with all zeros, "00:00:00:00:00".
In the screenshot below, on SiteB, I've setup a static hostname of "SiteARouter" so that I can access it via the friendly name versus the IP Address (192.168.1.1). From SiteB, I'm now able to access SiteARouter via name. Configure static hostname entries for all network resources you want to access on both your VPN sites.
That's it!! Enjoy.
Client to Site VPN
You should easily be able to add additional OpenVPN Clients (for Client to Site VPN) by generating additional RSA Certs/Key on your OpenVPN Server Router.
#Setup and initialize environment
PATH=/opt/bin:$PATH
cd /opt/etc/easy-rsa
PATH=/opt/bin:$PATH
cd /opt/etc/easy-rsa
source ./vars
./build-key Zoe-Laptop
./build-key Landon-Laptop
#Install SFTP so you can securely access your keys
#Location of keys = /opt/etc/easy-rsa/keys
#Connect as root
opkg install openssh-sftp-server
#scp is another alternative method to access your keys
[Tutorial] CentOS 6 OpenVPN Client - Connecting to Existing Site to Site VPN
Troubleshooting and FAQ:
- Watch my walk-through video
- Make sure the time is correct on both routers (NTP is setup, watch video)
- Check the logs
- Restore Default Configuration and start fresh (backup your current config, just in case).
Erase all data in NVRAM memory (thorough) @ http://192.168.1.1/admin-config.asp

Special Thanks to Shibby for the excellent firmware, the Entware Team, and Wasaga Computer's for their excellent blog (which is the original tutorial I used to successfully setup my first Site to Site VPN using TomatoUSB).
If you have any issues, have any questions or notice any mistakes, please don't hesitate to leave a comment. Your feedback will help me improve the tutorial and keep it up to date. Thank you.
./build-key Zoe-Laptop
./build-key Landon-Laptop
#Install SFTP so you can securely access your keys
#Location of keys = /opt/etc/easy-rsa/keys
#Connect as root
opkg install openssh-sftp-server
#scp is another alternative method to access your keys
Troubleshooting and FAQ:
- Watch my walk-through video
- Make sure the time is correct on both routers (NTP is setup, watch video)
- Check the logs
- Restore Default Configuration and start fresh (backup your current config, just in case).
Erase all data in NVRAM memory (thorough) @ http://192.168.1.1/admin-config.asp

Special Thanks to Shibby for the excellent firmware, the Entware Team, and Wasaga Computer's for their excellent blog (which is the original tutorial I used to successfully setup my first Site to Site VPN using TomatoUSB).
If you have any issues, have any questions or notice any mistakes, please don't hesitate to leave a comment. Your feedback will help me improve the tutorial and keep it up to date. Thank you.