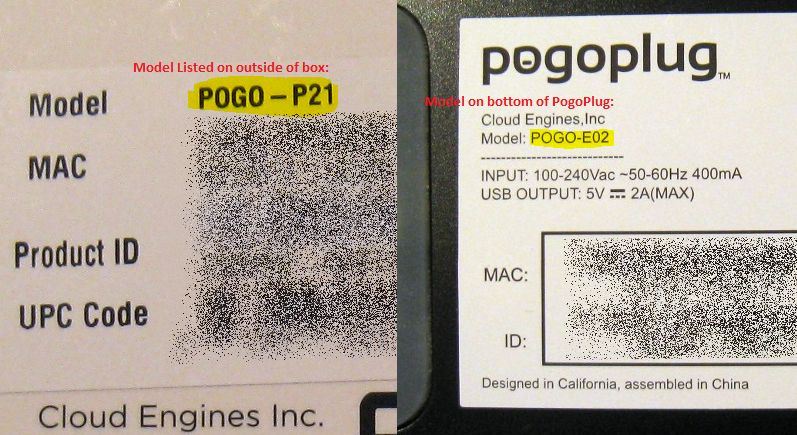
. Even though the box is labeled as a P21/P22/B01, chances are the Pogoplug itself will be a E02 model. I've bought at least 6 P21/B01 from various vendors - Adorama, JR.com, and Ebay - and so far I have only received E02. Note that recently a small percentage of users (~20-30%) have reported receiving a new P22 model which isn't supported under Arch Linux ARM.
The E02 model is the ideal choice with 256MB RAM and a 1.2Ghz CPU versus other models (Series 4) which only has 128MB RAM and 800Mhz CPU. Don't get fooled by the USB 3.0 Ports in the Series 4 model; the CPU is a bottleneck and there is no performance difference with the USB 3.0 ports. Saying that, I like the Pogoplug Series 4 form factor with its SATA USM slot. For the Pogoplug Series 4, I would recommend the USM slot compatible
This will be a work in progress, so please excuse the typos and grammar. Arch Linux ARM is constantly changing, so not everything is guaranteed to work.
- Watch out for run-on commands. I'm having issues with the blogger editor.
- For bootup issues, see Troubleshooting ALARM Boot Up Issues near the end.
- Pogoplug is installed behind a Router/Firewall on a secured LAN (home use only)
- The Pogoplug is new and hasn't been registered on my.pogoplug.com. If it was, you may need to enable SSH via my.pogoplug.com. Activation is required for the Pogoplug Mobile/Series 4.
If you only want to setup a simple NAS and/or have a unsupported Pogoplug version V3 (oxnas), please take a look at my
.
Note that with OpenSSH 7.0, SSH root login is disabled. Please try alarm/alarm instead. Switch to root by using the "su" command and password of "root".
Official Instructions for installing Arch Linux on the Pogoplug E02 can be found here:
Note that the uBoot installation instructions from archlinuxarm.org does not support booting into the default Pogoplug OS when nothing is attached. My summarized version below uses a different uBoot and will allow you to boot into the default Pogoplug OS when nothing is attached which is very useful for reinstallation.
For the Pogoplug Series 4 and Mobile, please use this tutorial for the latest uBoot (SD Card booting support) and then come back here to complete the installation.
Note: If you get a command not found for "wget" or "reboot", try adding "busybox" in front of the command - "busybox wget http://xxx", "busybox shutdown"
#Partition your USB flash/hard drive
/sbin/fdisk /dev/sda
# Type in the following commands to erase
# and re-partition USB flash/hard drive
#(WARNING - FLASH/HARD DRIVE WILL BE COMPLETELY WIPED):
#
# p # list current partitions
# o # to delete all partitions
# n # new partition
# p # primary partition
# 1 (one) # first partition
# <enter> # default start block
# <enter> # default end block (to use the whole drive)
# If you're using a hard drive, create a small
# 4GB partition instead of using the whole drive,
# leaving the rest for a data partition
# +4G # to create a 4GB partition
# w # write new partition to disk
#Format USB Flash Drive
cd /tmp
wget http://archlinuxarm.org/os/pogoplug/mke2fs
chmod 755 mke2fs
#format and label partition
./mke2fs -L ROOTFS -j /dev/sda1
#mount usb flash drive
mkdir -p /tmp/usb
mount /dev/sda1 /tmp/usb
#Download Arch Linux ARM (aka ALARM)
#and extract to USB Drive:
cd /tmp/usb
wget http://archlinuxarm.org/os/ArchLinuxARM-kirkwood-latest.tar.gz
tar -xzvf ArchLinuxARM-kirkwood-*.tar.gz
#Unmount USB Drive and reboot
rm ArchLinuxARM-kirkwood-*.tar.gz
sync # Takes a while when using a flash drive
cd ..
umount /tmp/usb
#Update uboot env variables
#Have uboot mount partition as ext3
#safer in power outages
#E02 only, V4 defaults to ext3 already
/usr/sbin/fw_setenv usb_rootfstype ext3
#Correct machid - make LED Green versus Orange
#Only for E02
/usr/sbin/fw_setenv machid dd6
reboot
Note that after the reboot, the IP Address of your Pogoplug may have changed. However, you should be able to ping it by name - "ping alarm". Otherwise double check your router or use a IP scanning tool like AngryIP (Legacy) to confirm the IP Address of your Pogoplug.
SSH back into your Pogoplug and login with the username and password of root/root. If root/root doesn't work, please try alarm/alarm. If you're using putty and still having issues, make sure to download the latest version.
Success? Congratulations! At this point, Arch Linux is now running on your Pogoplug.
Initial Arch Linux ARM Configuration and Package Installation
#Switch to root, password root
su
#Upgrade kernel and install some initial packages
#Hit Enter when prompted with "Enter a selection (default=all):"
#'Y' when prompted with linux-kirkwood and linux are in conflict.
#Remove linux? [y/N]
#Go get some coffee
pacman -Syu linux-kirkwood linux-kirkwood-headers ntp base-devel nano wget rsync
#list timezone
timedatectl list-timezones
#set timezone
timedatectl set-timezone America/Los_Angeles
#autostart ntp
#pogoplug has no hardware clock
systemctl enable ntpd
systemctl start ntpd
#Generate New OpenSSH Keys
rm /etc/ssh/ssh_host*
ssh-keygen -A
reboot
SAMBA Server - Setup your Pogoplug as a Network Attached Storage (NAS)
The Pogoplug makes an excellent NAS. Expect read/write performance between 23MB-28MB/s on a
wired gigabit network using ext3/ext4. If you are using a 10/100Mb network, expect a maximum transfer rate of 9-10MB/s, which is the limit of 10/100Mb network. Wireless will be slower. Using NTFS partition will also affect performance (don't use it).
If you plan to setup the Pogoplug as NAS using SAMBA with a hard drive, my recommendation would be to install ALARM directly on the hard drive and skip using a USB flash drive. This will avoid some potential boot up issues. To do this, create two partition, a small 4GB partition for ALARM and the rest for data.
The instructions below assumes you have ALARM installed on the first partition of your USB hard drive. Replace "/dev/sda2" (second partition on first hd) with "/dev/sdb1" (first partition second hard drive) if you have ALARM installed on a USB Flash Drive and adding a new USB Hard Drive for SAMBA.
Note that these instructions are only applicable to 2TB drives or less. If you have a 3TB drive, you need to use gdisk to setup a hybrid MBR, which is not covered in this tutorial.
#Create a 2nd Partition on your USB Drive
/sbin/fdisk /dev/sda
# Type in the following commands to create a 2nd
# partition on your USB hard drive
#
# WARNING - HARD DRIVE SHOULD NOT CONTAIN ANY DATA,
# EXCEPT ALARM INSTALLATION ON 1st PARTITION:
#
# p # list current partitions
# n # new partition
# p # primary partition
# <enter> # default to second partition
# <enter> # default start block
# <enter> # default end block #use the whole flash drive
# w # write new partition to disk
#Format newly created 2nd partition, label as USB
#a reboot may be required for new partition
#to be recognized
mkfs.ext3 -L USB /dev/sda2
#mount disk
mkdir -p /media/usb
#mount 2nd partition (/dev/sdb1)
mount /dev/sda2 /media/usb
#install samba and upgrade everything
pacman -Syu samba
#Create folder we'll be sharing
#will also hide the swap and lost+found folder
mkdir -p /media/usb/share
#download example smb.conf for public share
#no authentication require, everyone has
#read/write access to / (root$) and usb (/media/usb/share)
cd /etc/samba
wget http://dl.dropbox.com/u/42238/pogoplug/v2/smb.conf
#Edit smb.conf (optional)
#change name, add additional shares
#nano /etc/samba/smb.conf
#mount after reboot
#all one line
echo "LABEL=USB /media/usb ext3 rw,noatime,nofail 0 0" >> /etc/fstab
#start samba
systemctl start smbd nmbd
#autostart samba on reboot
systemctl enable smbd nmbd
#test from computer:
#\\pogoplugIPAddress\root$
#\\pogoplugIPAddress\usb
#reboot and test
reboot
Enable Swap File
Only create a swap file if you're using a hard drive. It is not recommended to setup a swap file on a USB flash drive as it can wear out and fail.
#This will create a 1024MB swap file
#Named "swapfile.img" in /media/usb (USB HD).
dd if=/dev/zero of=/media/usb/swapfile.img bs=1M count=1024
mkswap /media/usb/swapfile.img
#update swap file permissions
chmod 0600 /media/usb/swapfile.img
#You can now turn the swap file on using:
swapon /media/usb/swapfile.img
#check if swap is enabled
free
#turn swap off by using:
#swapoff /media/usb/swapfile.img
#enable swapfile on reboot
echo "/media/usb/swapfile.img none swap sw,nofail 0 0" >> /etc/fstab
#reboot and test
reboot
free
Apple AirPlay (aka Shairport) - Stream music from your iOS Device or iTunes
Compatible/Recommended USB Sound Cards (Plug and Play)
#Install some required packages
pacman -Sy libao alsa-utils avahi libpulse
#audio fix
echo "use_mmap=no" >> /etc/libao.conf
#Configure alsa - asound.conf file
cd /etc
wget https://dl.dropbox.com/u/42238/pogoplug/v2/asound.conf
#download pre-compiled version of shairport
#compiled 6/26/2014
cd /usr/local/bin
wget http://dl.dropbox.com/u/42238/pogoplug/v2/shairport
#make shairport executable
chmod a+x shairport
#or compile shairport on your own
cd /tmp
wget --no-check-certificate https://github.com/abrasive/shairport/tarball/master
tar xzf master
cd *shairport*
make
make install
#restart dbus
systemctl restart dbus
#autostart avahi-daemon
systemctl start avahi-daemon
systemctl enable avahi-daemon
#start shairport and test
shairport -a Living_Room -v
#Test, Control C to stop
#autostart shairport on reboot
#start shairport and test
systemctl start shairport
systemctl status shairport
#autostart shairport on reboot
systemctl enable shairport
#reboot and test
reboot
#Schedule ShairPort to restart daily
#switch editor to nano
export EDITOR="/usr/bin/nano"
#edit/create crontab
crontab -e
#paste in the below and exit
#restart shairport @ 5AM everyday
00 05 * * * /usr/bin/systemctl restart shairport
#list crontab
crontab -l
Adjusting the volume
#Find name of mixer control
#Typically PCM or Speaker
amixer
#Simple mixer control 'PCM',0
# Capabilities: pvolume pswitch pswitch-joined
# Playback channels: Front Left - Front Right
# Limits: Playback 0 - 38
# Mono:
# Front Left: Playback 27 [71%] [-8.26dB] [on]
# Front Right: Playback 27 [71%] [-8.26dB] [on]
#set volume to 90%
amixer set PCM 90%
#save setting
alsactl store
#Troubleshooting commands
lsusb
aplay -L
cat /proc/asound/card0/pcm0p/sub0/hw_params
SqueezeLite Player (SqueezeBox/Logitech Media Server Client)
pacman -Sy faad2 libmad mpg123 libao alsa-utils avahi
#if not already done
#audio fix
echo "use_mmap=no" >> /etc/libao.conf
#Configure alsa - asound.conf file
cd /etc
wget https://dl.dropbox.com/u/42238/pogoplug/v2/asound.conf
mkdir -p /usr/local/bin
cd /usr/local/bin
#download the latest squeezelite version
wget http://squeezelite-downloads.googlecode.com/git/squeezelite-armv5te
mv squeezelite-armv5te squeezelite
#make executable
chmod a+x squeezelite
#download service file
cd /etc/systemd/system
wget http://dl.dropbox.com/u/42238/pogoplug/v2/squeezelite.service
#edit name (optional)
#nano /etc/systemd/system/squeezelite.service
#start squeezelite and avahi-daemon
systemctl start squeezelite avahi-daemon
#autostart squeezelite and avahi-daemon on reboot
systemctl enable squeezelite avahi-daemon
SqueezeBox (Logitech Media Server) Installation
#Install pre-compiled version (7/30/2015)
pacman -U http://dl.dropbox.com/u/42238/pogoplug/v2/logitechmediaserver-7.9.0.arch2-1-arm.pkg.tar.xz
#start logitechmediaserver
systemctl start logitechmediaserver
#autostart logitechmediaserver on reboot
systemctl enable logitechmediaserver
#make music and playlist folder
mkdir -p /media/usb/share/music
mkdir -p /media/usb/share/playlist
#update permissions
chmod 777 /media/usb/share/music
chmod 777 /media/usb/share/playlist
#Configure @ http://pogoplug:9000 or http://ipaddress:9000
LMS Build Instructions
#Requires Swap of 512MB or more
#Takes 3 hours
#Create non-root account for building
mkdir -p /media/usb/share/build
chmod 777 /media/usb/share/build
pacman -Sy sudo adduser
adduser builder
echo "builder ALL=(ALL) ALL">> /etc/sudoers
su builder
cd /media/usb/share/build
#LMS has a perl version dependency
#pacman -Syu --ignore perl
Plex Media Server
Plex is probably the best solution for accessing your music over the internet using a computer, iPhone or Android device.
Note that Plex on the Pogoplug (ARM in general) does not support transcoding. This means your media need to be natively supported by your Plex Client (e.g., mp4/m4v on iOS devices).
Major kudos to moonman on ALARM forum for providing the PKGBUILD.
#Install pre-complied version (7/25/2015)
pacman -U http://dl.dropbox.com/u/42238/pogoplug/v2/plex-media-server-0.9.12.4.1192-1-arm.pkg.tar.xz
#start plexmediaserver
systemctl start plexmediaserver
#autostart plexmediaserver on reboot
systemctl enable plexmediaserver
#Plex Media Server Build Instructions
#Requires SWAP
pacman -Sy svn
mkdir /media/usb/share/build
chmod 777 /media/usb/share/build
#Create non-root account for building
mkdir -p /media/usb/share/build
chmod 777 /media/usb/share/build
pacman -Sy sudo adduser
adduser builder
echo "builder ALL=(ALL) ALL">> /etc/sudoers
su builder
cd /media/usb/share/build
svn checkout https://github.com/archlinuxarm/PKGBUILDs/trunk/aur/plex-media-server
cd plex-media-server
makepkg -A
#Configure @ http://PogoplugIPAddress:32400/manage
If you're having issues adding your media, try changing the permissions on the folder - chmod 777 /media/usb/share/music
AirPrint Server - Print to your non-AirPrint enabled printers
(2/19/2015) - Confirmed working. Cups is now at version 2.0.1. systemctl name changed from cups to org.cups.cupsd.
#Install CUPS and print drivers
pacman -Sy cups gutenprint ghostscript python2-pycups python2 avahi
#link python to python2
ln -s /usr/bin/python2 /usr/bin/python
#For HP Printer Drivers
pacman -S hplip
#For Samsung Printer Drivers
pacman -S splix
#Backup original cupsd.conf
cd /etc/cups
mv cupsd.conf cupsd.conf.org
#download my cupsd.conf
wget http://dl.dropbox.com/u/42238/pogoplug/cupsd.conf
#Start CUPS
systemctl start org.cups.cupsd
Now open up your web browser and go to http://alarm:631/admin.
This part is YMMV. Not all printers will work.
Click the "Add Printer" Button.
In my case, I am using a Brother HL-2270DW (highly recommended, works great and cheap toner) which has built in wireless and supports various printing options - socket, ipp, http, etc. I'm going to use socket (AppSocket/HP JetDirect) which is the same option you would select if you had your USB printer directly connected to your PogoPlug.
USB attached printers should be auto detected (untested).
For the Brother wireless printer, the Connection address I'm using is "socket://<PrinterIPAddress>:9100" ( for the record "ipp://<PrinterIPAddress>/pcl_p1" would also work).
If you're using a DD-WRT or TomatoUSB Router as your print server, "socket://<RouterIPAddress>:9100", would be the correct Connection address..
Name your printer. Check the "Share This Printer" checkbox. Select the Make/Model of your Printer. Basically you are selecting the drivers to use. For my Brother HL-2270DW, I went with "Generic"->"Generic PCL 6/PCL XL Printer".
Click Add Printer.
Set your Default Options.
Print a test page. Maintenance->Print Test Page.
Printing a test page needs to work. If not, you can not continue. Not all printers will work. Try different drivers (or a different printer) if you're having a problem with printing a test page.
Back in the SSH Console
#download avahi airprint script
mkdir -p /opt/airprint
cd /opt/airprint
#this is all one line
wget -O airprint-generate.py --no-check-certificate https://raw.github.com/tjfontaine/airprint-generate/master/airprint-generate.py
#make script executable
chmod 755 airprint-generate.py
#add mime types needed for iOS6
echo "image/urf urf string(0,UNIRAST<00>)" > /usr/share/cups/mime/airprint.types
echo "image/urf application/pdf 100 pdftoraster" > /usr/share/cups/mime/airprint.convs
#autostart avahi-daemon
systemctl start avahi-daemon
systemctl enable avahi-daemon
#restart cups to pick up new mime types
systemctl restart org.cups.cupsd
#Generate AirPrint service file
cd /etc/avahi/services
/opt/airprint/airprint-generate.py
#Check for AirPrint-<PrinterName>.service file
ls
#Test AirPrint from iOS Device
#autostart cupsd after reboot
systemctl enable org.cups.cupsd
As a reference please check out this posting -
[Tutorial] Apple AirPrint on TomatoUSB Router
Google CloudPrint - Print over the internet via Chrome Web Browser. Share your printer with friends/family.
Requires AirPrint Server (Cups) configuration above.
Updated and verified (7/26/2015)
pacman -Sy git
#download cloudprint
mkdir /opt
cd /opt
git clone git://github.com/armooo/cloudprint
#build and install cloudprint
cd /opt/cloudprint
python2 setup.py build
python2 setup.py install
#Run once to create printer.
#Follow instructions to claim printer.
cloudprint
#Test print from your Chrome web browser
#Control+C to close cloudprint
#python2-daemon needed to demonize cloudprint
#Install pre-compiled version
pacman -U http://dl.dropbox.com/u/42238/pogoplug/v2/python2-daemon-2.0.5-1-any.pkg.tar.xz
systemctl enable cloudprint.service
systemctl start cloudprint.service
#Instructions for building python2-daemon from AUR
#https://aur.archlinux.org/packages/python2-daemon/
#mkdir -p /media/usb/share/build
#cd /media/usb/share/build
#switch to non-root account to build
#wget https://aur.archlinux.org/packages/py/python2-daemon/python2-daemon.tar.gz
#tar -xvf python2-daemon.tar.gz
#cd python2-daemon
#makepkg -Acs
#Clear google credentials/auth files
#not sure if this is still valid.
#rm /root/.cloudprintauth
#rm /root/.cloudprintsaslauth
Cloudprint is very fragile. If you're having start-up or printing issues try the following steps.
- Clear your Google CloudPrint Print Queue - https://www.google.com/cloudprint/#jobs
- Delete your stored credential and reboot and start over.
One more thing regarding CloudPrint, my recommendation is to set up a new Google Account dedicated just for CloudPrint. Use this account for the above cloudprint login, and then share your printer(s) with your main account. I'm a little paranoid of having my email authentication stored on my router (even though its hashed or encrypted).
Re-install my.pogoplug.com service (original software)
Great piece of software. My favorite is the iOS/Android app automatic photo/video backup feature. This is a simple and effective way to backup your phone's camera stream.
[Updated 5/14/2015] - Cloud Engine software was updated to 3.4.5.10
Please go here for latest instructions/update:
http://archlinuxarm.org/forum/viewtopic.php?f=18&t=3343 (Thanks moonman!)
#If upgrading from previous release
#uninstall old version
pacman -R pogoplug
#you may need to delete this file otherwise
#the new package will complain
#rm /usr/local/cloudengines/bin/hbplug.conf
#install pogoplug software
pacman -U https://dl.dropboxusercontent.com/u/15043728/ArchLinuxArm/my.pogoplug.com/pogoplug-3.4.5.10-1-arm.pkg.tar.xz
#download my sample pogoplug.conf file
#if upgrade, you can skip this
cd /etc
wget http://dl.dropbox.com/u/42238/pogoplug/v2/pogoplug.conf
#edit configuration file
#edit vfsdir0
#add svcid (ID) from the bottom of your PogoPlug (no dashes)
nano /etc/pogoplug.conf
##example below: vfsdir<number>=<name>,<path>
#vfsdir0=PogoPlug_USB,/media/usb/share
#installdir=/usr/local/cloudengines
##datadir=.
#datadir=.
#nohotplug=1
##use the ID from the bottom of your Pogoplug
#26 char (no dashes)
#svcid=35DFBFL73RD2CX5FJMAAAA1111
#tcpport=89
#note /etc/pogoplug.conf will be copied to
#/usr/local/cloudengines/hbplug.conf on service startup
#hbplug.conf is the file that matters.
#if things are not working as expected, verify
#the content of the hbplug.conf file
#start pogoplug service
systemctl start pogoplug
#autostart pogoplug service on reboot
systemctl enable pogoplug
#reboot and register @ http://my.pogoplug.com
reboot
Enable uPNP/DNLA (my.pogoplug.com)
The Cloud Engine my.pogoplug.com software has a (limited) built-in uPNP/DNLA server. Also note that Plex Media Server and Logitech Media Server both have built in DNLA Servers.
On my.pogoplug.com -> Settings -> Media
Wireless Configuration
Last Updated: 8/14/2013 (needs updating 6/26/2014)
The following USB wireless adapters are Plug and Play:
Alfa AWUS036H (RTL8187)
Etekcity High Power 802.11 B/N/G 300M USB Wireless 1000mw Wifi Network Adapter with Dual Antenna (RT3072) - You can save yourself a few dollars picking up a generic one from China on Ebay.
These USB wireless adapters are not Plug and Play:
Airlink101 AWLL5099
Mini Wireless 150Mbs USB Ralink RT5370
NETCFG has been replaced by NETCTL
https://wiki.archlinux.org/index.php/Netctl
#install netctl and related packages
pacman -Sy wireless_tools netctl ifplugd wpa_actiond dialog
#Connect to wireless network and create wireless profile
cd /etc/netctl
wifi-menu
#check if wireless profile got created
#you should see wlan0-SSIDName
ls /etc/netctl
#Auto Connect to Wireless Network
systemctl enable netctl-auto@wlan0.service
#Auto Connect to Wired Network
systemctl enable netctl-ifplugd@eth0.service
#reboot and test
ifconfig
iwconfig
Motion WebCam
Attach a USB Webcam to your Pogoplug and turn it into a surveillance system.
More info -
http://www.lavrsen.dk/foswiki/bin/view/Motion/MotionGuide
Confirmed working with:
Logitech HD Webcam C270
#install motion and other required packages
pacman -S motion x264 fswebcam
#change to motion folder and edit motion.conf file
cd /etc/motion
#turn off localhost access only
sed -i 's:webcam_localhost on:webcam_localhost off:' ./motion.conf
#adjust resolution to 640x480
sed -i 's:width 320:width 640:' ./motion.conf
sed -i 's:height 240:height 480:' ./motion.conf
#disable http remote control
sed -i 's:control_port 8080:control_port 0:' ./motion.conf
#change webcam http port to 8088
sed -i 's:webcam_port 8081:webcam_port 8088:' ./motion.conf
#change folder where picture/video are saved
sed -i 's:/usr/local/apache2/htdocs/cam1:/media/usb/share/motion_capture:' ./motion.conf
#create required folders
mkdir -p /var/run/motion
mkdir -p /media/usb/share/motion_capture
#Start motion and access webcam @ http://pogoplug:8081
#Bug in Chrome, no longer allow you to view stream.
#Use Firefox or VLC
#A little hack to get motion to detect webcam correctly
BitTorrent Sync
BitTorrent Sync is a free utility that uses the bittorrent protocol to keep folders in sync across devices. It can be used with OS X, Windows, Android and Linux.
#create folder
mkdir -p /usr/local/bin
cd /usr/local/bin
#create default btsync.config
btsync --dump-sample-config>/etc/btsync.conf
#download service file
cd /etc/systemd/system
wget http://dl.dropbox.com/u/42238/pogoplug/v2/btsync.service
#start btsync
systemctl start btsync
#autostart btsync on reboot
systemctl enable btsync
#http://pogoplug:8888/gui
Transmission, Sabnzbd, SickBeard and CouchPotato
Requires a swap partition or swapfile - 1GB recommended.
pacman -Sy sabnzbd sickbeard-git couchpotato-git transmission-cli python2-pyopenssl
#start and stop all apps to create config files
systemctl start transmission sabnzbd couchpotato sickbeard
#check status
systemctl status transmission sabnzbd couchpotato sickbeard
#shut them down
systemctl stop transmission sabnzbd couchpotato sickbeard
#transmission - allow login from any computer
cd /var/lib/transmission/.config/transmission-daemon/
sed -i 's^"rpc-whitelist-enabled": true^"rpc-whitelist-enabled": false^' ./settings.json
#sabnzbd - allow login from any computer
cd /opt/sabnzbd
sed -i 's^host = localhost^host = 0.0.0.0^' ./sabnzbd.ini
#start all
systemctl start transmission sabnzbd couchpotato sickbeard
#auto start after reboot
systemctl enable transmission sabnzbd couchpotato sickbeard
#make sure you change the permission of your folders appropriately
#chmod 777 /media/usb/share/downloads
# sabnzbd - http://alarm:8080
# couchpotato - http://alarm:5050/
# sickbeard - http://alarm:8081/
# transmission - http://alarm:9091
Sonarr/NzbDrone
#SONARR/NZBDRONE
pacman -Sy mono mediainfo sqlite3
cd /opt
mkdir sonarr
cd sonarr
wget http://update.sonarr.tv/v2/master/mono/NzbDrone.master.tar.gz
tar xvfz NzbDrone.master.tar.gz
cd NzbDrone
mono --debug NzbDrone.exe
cd /etc/systemd/system
#Enable sonarr service on reboot and start
systemctl enable sonarr.service
systemctl start sonarr.service
#Give it plenty of time to startup
#http://IPAddress:8989
TimeMachine Backup
Configure Netatalk in Arch Linux for Time Machine Goodness
OpenVPN (Client)
As a reference please check out my other two tutorials on OpenVPN:[Tutorial - 30 Minutes or Less] Site to Site VPN with TomatoUSB and OpenVPN
[Tutorial] CentOS 6 OpenVPN Client - Connecting to Existing Site to Site VPN (TomatoUSB)
pacman -Sy openvpn
#generate keys on CA and copy them over
mkdir -p /etc/openvpn/keys
#copy sample client.conf to /etc/openvpn
cp /usr/share/openvpn/examples/client.conf /etc/openvpn
#edit openvpn client.conf
nano /etc/openvpn/client.conf
#Update the following lines
#remote vpnserverIPAddress 1194
#ca /etc/openvpn/keys/ca.crt
#cert /etc/openvpn/keys/pogoplug.crt
#key /etc/openvpn/keys/pogoplug.key
#start VPN manually to test
openvpn --config /etc/openvpn/client.conf
#autostart OpenVPN client on reboot
systemctl enable openvpn@client.service
Webmin
pacman -Sy webmin perl-net-ssleay nano
#allow any IP to connect
sed -i 's^127.0.0.1^0.0.0.0^' /etc/webmin/miniserv.conf
#start webmin
systemctl start webmin
#auto start after reboot
systemctl enable webmin
#https://PogoplugIPAddress:10000
OwnCloud (nginx php-fpm sqlite)
Note - I'm no longer actively working on owncloud. The default PogoPlug software works well enough for my needs. There is a bug with using a self sign certificate (expect a WebDav error). You'll need to mount a different disk for your owncloud data folder - /srv/http/owncloud/data (I was not able to get owncloud working if I used a different data folder path).
pacman -Sy owncloud nginx php-fpm sqlite3 php-sqlite
#copy owncloud files
cd /srv/http
cp -R /tmp/owncloud .
#update owner
chown http:http /srv/http/owncloud
chown http:http /srv/http/owncloud/config
chown http:http /srv/http/owncloud/apps
#uncomment out required modules
sed -i 's^;extension=gd.so^extension=gd.so^' /etc/php/php.ini
sed -i 's^;extension=xmlrpc.so^extension=xmlrpc.so^' /etc/php/php.ini
sed -i 's^;extension=zip.so^extension=zip.so^' /etc/php/php.ini
sed -i 's^;extension=iconv.so^extension=iconv.so^' /etc/php/php.ini
sed -i 's^;extension=sqlite3.so^extension=sqlite3.so^' /etc/php/php.ini
sed -i 's^;extension=pdo_sqlite.so^extension=pdo_sqlite.so^' /etc/php/php.ini
#Maximum execution time of each script, in seconds
sed -i 's^max_execution_time = 30^max_execution_time = 300^' /etc/php/php.ini
#Maximum amount of time each script may spend parsing request data.
sed -i 's^max_input_time = 60^max_input_time = 600^' /etc/php/php.ini
#Maximum allowed size for uploaded files.
sed -i 's^upload_max_filesize = 2M^upload_max_filesize = 100M^' /etc/php/php.ini
#Maximum size of POST data that PHP will accept.
sed -i 's^post_max_size = 8M^post_max_size = 400M^' /etc/php/php.ini
#Maximum amount of memory a script may consume
sed -i 's^memory_limit = 128M^memory_limit = 512M^' /etc/php/php.ini
#http://doc.owncloud.org/server/5.0/admin_manual/installation/installation_others.html#nginx-configuration
#backup config and download working nginx.conf
cd /etc/nginx
mv /etc/nginx/nginx.conf /etc/nginx/nginx.conf.original
wget http://dl.dropbox.com/u/42238/pogoplug/nginx.conf
#Configure SSL
#http://wiki.nginx.org/HttpSslModule
#create folder to store certs
mkdir -p /etc/nginx/certs
cd /etc/nginx/certs
#Now create the server private key
#you'll be asked for a passphrase
openssl genrsa -des3 -out pogoplug.key 1024
#Create the Certificate Signing Request (CSR):
openssl req -new -key pogoplug.key -out pogoplug.csr
#Remove the necessity of entering a passphrase
#for starting up nginx with SSL using the above private key:
cp pogoplug.key pogoplug.key.org
openssl rsa -in pogoplug.key.org -out pogoplug.key
#sign the certificate using the above private key and CSR
openssl x509 -req -days 3650 -in pogoplug.csr -signkey pogoplug.key -out pogoplug.crt
#start nginx and php-fpm
systemctl start php-fpm
systemctl start nginx
#autostart nginx and php-fpm after reboot
systemctl enable php-fpm
systemctl enable nginx
#Finish configuration via https://PogoPlugIPAddress/owncloud/ or https://pogoplug/owncloud
Backup and Restore
Having a backup is always a good idea and is highly recommended. Its quick and simple and will save you the hassle of re-installation from scratch if anything ever happens to your flash drive (very common) or if you want to duplicate/clone your setup to another Pogoplug.
Offline Backup (Recommended) - These two methods, Disk Image and Tarball, requires unplugging the usb drive you want to backup and plugging it into another linux computer or VM, another pogoplug running ALARM (Arch Linux ARM), or same Pogoplug running alarm using a different USB flash drive.
Credit/Reference
1) Disk Image
#assumes /dev/sdb is the flash drive you want to backup
dd if=/dev/sdb of=/savetopath/pogoplug.e02.rootfs.backup.img bs=4M
#restore, swap if (in) and of (out)
dd if=/savetopath/pogoplug.e02.rootfs.backup.img of=/dev/sdb
2) Tarball (recommended and what I use)
#assumes the flash drive you want to backup is /dev/sdb1
mkdir /tmp/usb
mount /dev/sdb1 /tmp/usb
#backup to root
cd /tmp/usb
tar -cvzf /pogoplug.e02.rootfs.backup.tar.gz ./
#restore
cd /tmp/usb
However, I understand in certain cases you have no choice - like when your data is already on a NTFS drive and you have nowhere to back it up. So saying that, try the following:
pacman -Sy ntfs-3g udevil
systemctl enable devmon@root.service
systemctl start devmon@root.service
df -h
#you should see your drive mounted under
#/media/xxx
#You might need to edit
nano /etc/udevil/udevil.conf
Please see
Obihoernchen's blog for some NTFS performance tip. Also note, people have reported boot up issues with NTFS drives attached.
Again, this is something I don't use so I can not support it. And again, keep things simple and use a dedicated ext3 drive if possible.
E02 model only. V4 doesn't have the option to boot to stock OS with USB flash drive unplugged.
Credit to Moustafa.
This isn't truly reverting your Pogoplug back to stock. What it will do is allow you to disconnect your USB flash drive from your Pogoplug and have it boot up to the default Pogoplug OS and connect to the my.pogoplug.com service.
During the uBoot installation, the script asks whether to disable pogoplug service, and the default answer is y
Would you like to disable the pogoplug services? [Y/n]
You can turn back on the my.pogoplug.com service by the following steps:
- Boot into original firmware (disconnect all USB drives)
- Connect using SSH
- Edit /etc/init.d/rcS script, and remove the comment(#) in front of the line reading /etc/init.d/hbmgr.sh start
After rebooting into original firmware again, the my.pogoplug.com services will be available as before.
Troubleshooting ALARM Boot Up Issues
The most common (and frustrating) issue with the Pogoplug and Arch Linux ARM is getting your Pogoplug to boot up consistently. This is not going to be an exhaustive troubleshooting guide, but I did want to point out some things I've learned and experienced that may help you.
- Double check your router for the correct IP Address of your Pogoplug. Otherwise use a network scanning tool like
AngryIP (Legacy) to confirm the IP Address of your Pogoplug. On my iPhone, I use a free app call
iNet.
- Not all USB drives (flash or hd) will behave the same. Use a high quality name brand USB drive if possible. If you experience boot up issues, try a different USB flash drive or hard drive. I've noted the USB drives that I've had success with above.
- USB flash drive or hard drive is corrupted due to improper shutdown. Plug the flash drive into a linux computer or another Pogoplug running ALARM and perform a
fsck.
#/dev/sdb1 = drive and partition that needs fixing
fsck /dev/sdb1
- A cold/hard boot (disconnect/reconnect power cord) can behave differently than a warm boot (executing the 'reboot' command via the console). Yes, very strange. I've experienced where if I do a cold boot, the default Pogoplug OS will boot up and not ALARM. However, if I execute a
reboot command from within the default Pogoplug OS, ALARM will boot up properly. I've also experienced the opposite, where ALARM will boot up properly from a cold boot, but if I execute a 'reboot' command via the console, ALARM will not boot properly. This all depends on your USB flash/hard drive. Try the following, it may help and typically it shouldn't hurt. I'm using the below bootcmd for two of my Pogoplugs with Western Digital My Passport drives.
#E02 - Only. Fix boot issue with some USB drives
#credit - http://archlinuxarm.org/forum/viewtopic.php?f=18&t=1717&p=9527#p9527
#print default bootcmd value
fw_printenv bootcmd
#default bootcmd
#[root@pogoplug ~]# fw_printenv bootcmd
#bootcmd=usb start; run force_rescue_bootcmd; run ubifs_bootcmd; #run usb_bootcmd; usb stop; run rescue_bootcmd; run pogo_bootcmd; #reset
#update bootcmd value to start, stop and start usb again
#all one line
fw_setenv bootcmd "usb start; usb stop; usb start; run force_rescue_bootcmd; run ubifs_bootcmd; run usb_bootcmd; usb stop; run rescue_bootcmd; run pogo_bootcmd; reset"
#confirm update
fw_printenv bootcmd
- If you plan to attach a hard drive for SAMBA, try installing ALARM on a small partition on the hard drive (4GB) and skip using a USB flash drive. This will allow you to avoid any boot up issues related to multiple USB drives attached. [Update - 9/25/2013] I've updated the SAMBA installation section.
- If you have multiple USB drives attached, try Moustafa blog -
Booting Pogoplug From The Correct USB Disk. Note that Moustafa's blog isn't applicable if you're having boot up issues with only one USB drive attached.
-
Setup Netconsole to see what truly is happening. Netconsole allows you to remotely view the Pogoplug boot up process. Here is a tutorial on setting up
Netconsole.
- Do a re-installation. Unplug your USB drive and start over. During the uboot installation, reset the uboot env back to default.
- Try using a static IP Address. After installing ALARM to your USB drive (do not reboot), while still in the Pogoplug OS, edit the /tmp/usb/etc/netctl/eth0 file. You'll need to use vi (google if you're not familiar with using vi).
#while in the Pogoplug OS, after installing ALARM
vi /tmp/usb/etc/netctl/eth0
The content of the eth0 file should look like the following:
Description='A basic static ethernet connection'
Interface=eth0
Connection=ethernet
IP=static
Address=('192.168.1.100/24')
Gateway='192.168.1.1'
DNS=('192.168.1.1')
- Corrupted uBoot Environment. You'll need to reset via a Serial console. Please see my tutorial on setting up a
Serial Console Connection for the Pogoplug E02.
- On the Pogoplug V4 and Mobile, booting up to the default Pogoplug OS without the USB drive attached is not support; you'll get a green blinking led. If your installation is corrupted or not working for whatever reason and want to reinstall ALARM, you'll need to use another linux computer - http://archlinuxarm.org/forum/viewtopic.php?f=18&t=3312&p=19207#p19207
Miscellaneous Commands
#update hostname to pogoplug
hostnamectl set-hostname pogoplug
#change password
passwd
#poweroff (note that the light will not turn off)
sync #just in case
poweroff
#check what ports are used/listening on
netstat -nptl
#check disk space usage, human readable output
df -h
-------------------------------------------------------------------
That's it for now.
Please leave a comment if this is helpful or if you run into any issues. Thanks